VPCART supports running more than one shop in one database. Each can share
products and have products that are unique to them.
Note: If you
want to setup two sites using one db, do not put the second site into the same
domain with a different subfolder. We would suggest you to put the second site
into a new domain or subdomain rather than into a subfolder.
The reason
for this is that when both sites are put into the same domain, the session in
both sites will be mixed together and you might have a lot of session issues
later.
If you put a second site into a new domain or into a subdomain of
the main site, both the new domain/subdomain and the main site will have their
own session variables and will not mix with each other.
The following is a basic guide on how to set up multiple sites to run from
one single database:
1.
Create 2 VPCART sites on your server.
If you have an existing live site
already running VPCart, please create another new site by copying the same files
to your second site.
Open shop$config.asp (under “config” folder
and “admin/config” folder) using notepad or text editor in second site
and change the xssl and xmysite value to use the second site URL
eg:
const xssl="http://site2.example.com"
const
xmysite="http://site2.example.com"
2.
In the first site (your existing live site), Please log into
your administration and then run the copy configuration utility to
populate the second configuration table for the second site.
To do
this, login to your administration and go to :Misc > Multi
Sites Set Up Tool

You should be presented with two
options below:
A) “New copy”, that means you want the new
config table to have all
VPCart default configuration value.
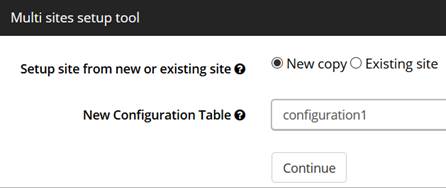
The new configuration table name is
configuration1.
You can change configuration1
to your own
liking eg configuration_site2
B)
“Existing site”, that means you want the new config table to be
copied from your existing live site (first site) configuration table
values.

The new configuration table name is
configuration1.
You can change configuration1
to your own
liking eg configuration_site2
3.
Click Continue.
4. If
completed, you should see success message as shown below:

5. Open
shop$config.asp file
using notepad or text editor (under “config” folder and
“admin/config” folder) each in the second site and change the
following so it is pointing to the second configuration
table.
const
xconfigtable="configuration_site2"
Please also change the
xshopid value to something unique for second site. This can be
anything as long as it is different to the xshopid of other VPCART sites
installed on your server eg:
const
xShopId="mystore2"
If you want certain
products to load for certain site, then you will need to set up product matching
by entering an unique value into the xproductmatch eg:
const
xproductmatch="store2"
6.
Open
shop$config.asp file using notepad or text editor (under
“config” folder and “admin/config” folder) each in the first
site and change the xshopid value to something unique for first
site. This can be anything as long as it is different to the xshopid of
other VPCART sites installed on your server eg:
const
xshopid="mystore1"
If you already have a value for your xshopid
please ignore then.
If you want certain
products to load for certain site, then you will need to set up product matching
by entering an unique value into the xproductmatch eg:
const
xproductmatch="store1"
7.
Repeat Step 1 until Step 5 for the 3rd site and so on
if you still have other sites to use the same single db.
8.
Please login to the administration for the first site and go to the
Advanced Settings > Software Configuration menu. Search for
xproductmatch and set it to Yes.
Repeat this process for the
2nd site, 3rd site and so on.
9.
Login to the administration for the second site and go to: Website
>Layout Manager. Please see if your xshopid for second
store is already selected by default. In this example, second site was having
xshopid with value mystore2 in step 5 before. If mystore2
is showing in the dropdown list, please click Choose Store
button.
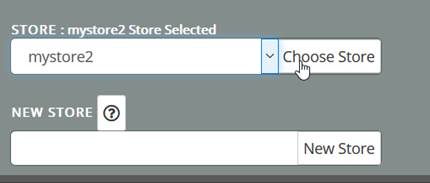
If mystore2 is not showing in the
dropdown list, please enter the .
Then click the “New Store” button.
Now you can start
adding a layout for your second site. You can add the left column, center column
or right column for the second site.
Please repeat this process for your
3rd site and so on.
10. For all
products you add into your database, ensure that you enter the value from
xproductmatch for either the first store, 2nd store,
3rd store and so on into the Match Product field of
the View/Edit product administration page.

If you leave this field blank, the
products will display in all sites.
Note: If you have more than two stores and you want a product to
appear in multiple stores but not in all stores, in the Match Product
field of the product record, you can enter a comma-delimited list of shops you
want the product to appear in.
For example – store1,store2,store3
Product matching now includes xshopid of the store to
be saved into Orders table. The value of xshopid is saved in the
“storematch” field in Orders table. This is to restrict admin users that
are “Restricted Administrator” type to only see orders containing the
Store ID for the site they have accessed through the admin. However, an admin
user that is a “Normal Administrator” can access all orders that comes
from all stores.
Since VPCart 8, there is also an enhancement to
shopexd.asp to ensure that if an user manually updates the id in the URL, a
validation is carried out to ensure that they are legitimately allowed to view
that product.
For example, if a merchant has setup product matching for
two stores, store A and store B. Let’s say product X with catalog id 1 belongs
to store A. When customers open this link shopexd.asp?id=1 from store B, the
customers cannot view product X. They can only view the product X in store
A.