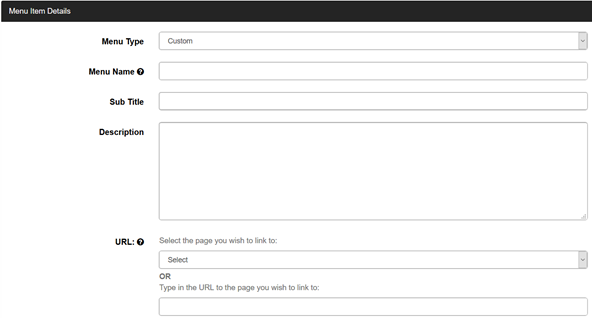
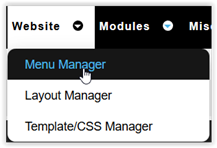
|
Menu
Type |
This is new
field in VPCart 9.0. You can choose Custom or
Category.
For
Custom: You can create
any custom menu you want that can link to products page, content page,
blog page, contact us page etc..
For Category: If you
need to show a category name as menu with link in the top navigation, then
you should select this.
|
|
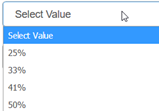
Category |
This field will
only show if you select “Category” from Menu Type. Select a
category for your menu.
There is option for “Select All” or
you can leave it empty by default “Select Category” , both will
display all categories in a dropdown.

Below is
how it looks after we have chosen the “Select All”:

If we
only want to show a menu for a category, then you can pick one of the
category you want. Example below showing we have created a category
name “Kitchen Set” and picked a category “Kitchen”:

Below is the
sample of how it looks in front store for the single category
“Kitchen”:

Note:
If you are
using Menu Type “Category”, and you leave the field “Menu Name”
empty, it will be automatically display the category name from your
selected Category, like example below :

And
this is the display in the front store :

|
|
Menu
Name |
This is the
display name of the menu item. If you are using multiple languages on your
site and you want it to translate, you can enter a keyword from the
languages table here.
For example,
instead of entering Products as your menu name, use
langproduct01.
|
|
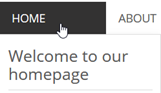
Sub
Title |
This is new
field in VPCart 9.0. This is the
sub title that
will show underneath the menu name.
Example, for the menu ‘Home’, we
put a sub title “Welcome to our homepage”.
Below is how it
looks:
|
|
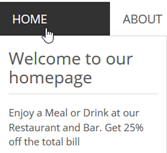
Sub
Description |
This is new
field in VPCart 9.0. This is the
description for
the menu item.
Example, for the menu ‘Home’, we put few lines of text
:
Enjoy a Meal or Drink at our Restaurant and Bar. Get 25% off the
total bill
Below is how it looks:
|
|
Menu
Image |
This is new field in VPCart 9.0. You can upload image
to the menu. Click “Upload image” to upload an image for your
menu.
Note : For “Top Level Item” menu, this “Menu
Image” will only available for the following "Parent Menu Display
Style" value :
- Mega Menu with left side image
- Mega
Menu with right side image
|
|
Megamenu Image
Size |
This is new field in VPCart 9.0. You can set the mega
menu image size you want by picking from available dropdown.
Note : This
“Megamenu Image Size” will only available for the following
"Parent Menu Display Style" value :
- Mega Menu with left
side image
- Mega Menu with right side image
|
|
URL |
You can either select an item from the dropdown list or
enter your own URL into the box.
The dropdown box contains
commonly used pages and also allows you to link to any records you have in
the Content table.
If you enter your own URL into the box, make sure
you enter with prefix http:// or https:// eg.
https://www.example.com.
|
|
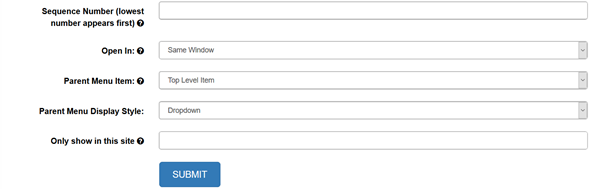
Sequence Number (lowest number appears
first) |
This determines which order this item will appear in
the menu. You can enter a numeric value eg 10. |
|
Open In |
You can have menu items open links in the same window
or a new browser window.
|
|
Parent Menu Item |
If the menu item you are creating is a sub-menu item,
you need to select the parent menu item from this list.
|
|
Parent Menu Display Style |
This is new field in VPCart 9.0. There are five styles
you can choose:
DROPDOWN : This is the standard
dropdown style. Example as below:
Note : Parent menu with
Dropdown can only allow 1-tier of sub menu.
WIDE
DROPDOWN : This is the wide dropdown style. See example
below:

Note : Parent menu with
Wide Dropdown can only allow 1-tier of sub menu.
MEGA
MENU : This is the Mega Menu style. If parent menu is selected with
this style, the dropdown width will be showing in full width (100%) of the
top navigation bar, as like example below :

MEGA MENU WITH LEFT SIDE
IMAGE : Allow to show in Mega Menu style in 100% width and with image
on the left of the dropdown. See example below:

MEGA MENU WITH RIGHT SIDE IMAGE : Allow to show
in Mega Menu style in 100% width and with image on the right of the
dropdown. See example below:
 |
|
Sub Menu Style
|
This is new field in VPCart 9.0.
Note :
This is only for sub menu, and will be hidden for parent menu when your
menu is a Custom. If your parent menu type is Category, this
Sub Menu Style is available for selection.
In addition, for
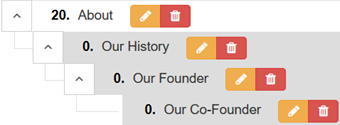
4th tier of sub menu, this Sub Menu Style will
not be available because 4th tier sub menu is the last level
VPCart supports and cannot have more sub levels under it. In below example
the sub menu “Our Co-Founder” is the 4th tier and
editing the sub menu will not see the field Sub Menu
Style.
Below are the details of each
Sub Menu Style:
1. Default Sub Menu : This is the
standard for sub menu style.
If the parent menu
display style is a Dropdown type, then this Default Sub Menu
will be available for selection for the 2nd tier sub menu.
Note : For a sub menu that have parent menu display style
selected as one of the following :
- Mega Menu
- Mega Menu with left
side Image
- Mega Menu with right size Image
This Default Sub
Menu will not be available for the sub menu.
2. Sub Menu
with left image : Choose this if you want the sub menu to show with
image on the left of dropdown. Make sure you upload an image for your sub
menu first. See example below:
If the parent menu display style is
a Dropdown type, then this Sub Menu with left image will be
available for selection for the 2nd tier sub menu.
Note : For a sub menu that have parent menu
display style selected as one of the following :
- Mega Menu
- Mega
Menu with left side Image
- Mega Menu with right size Image
This
Sub Menu with left image will not be available for the sub
menu.
Also, if you are using Menu Type
“Category” for a parent menu and you have selected “Sub Menu
with left image” without uploading any image, then system will default
showing the category image. For example:
Category : leave
empty or Select ALL
Menu Name: langproductproduct
Menu
Image: leave empty
Parent Menu Display Style :
Dropdown
Sub Menu Style: Sub Menu with left image
Here is
the preview of the result in front store:

3. Column Header Display : Choose this if you
want the sub menu title to show as column header (in capital letters) and
a line below the title. See example below:
And below is the example for
six same level sub menus using this Column Header Display:

NOTE : This
Column Header Display will only available if the parent menu
display style is a Mega Menu or Mega Menu with left side
Image or Mega Menu with right size Image.
Also
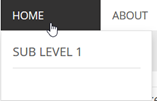
take note that for Column Header Display, this will only support
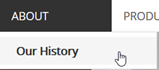
1-tier of sub menu under it. Example below showing that OUR HISTORY
menu is using Column Header Display, so the menu caption is all in
capital letters, and the “Our Founder” is the only 1-tier of sub
menu under it.
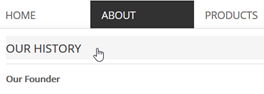
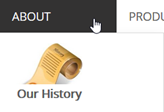
4. Tab Header Menu Display : Choose this if you
want the sub menu to show as tab. See example below:

NOTE : This Tab Header Menu Display will
only available if the parent menu display style is a Mega Menu or
Mega Menu with left side Image or Mega Menu with right size
Image.
Also this Tab Header Menu Display can have sub
menu until 2-tiers under it. If you want to have until 2-tiers of sub menu
below the Tab Header Menu Display, the sub menu under it you can
pick as Column Header Display.
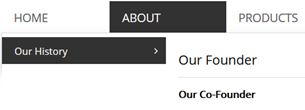
Example below showing
2nd level sub menu “Our History” assigned to Tab
Header Menu Display style and 3rd level sub menu “Our
Founder” assigned to Column Header Display styke and this
kind of setup allow to show the 4th level sub menu “Our
Co-Founder”.

Note :
ABOUT -
1st tier
Our History – 2nd tier
Our
Founder – 3rd tier
Our Co-Founder –
4th tier
5. Image Grid Display : Choose
this if you want the sub menu to show as image grid (text at below of
image). Make sure you upload an image for your sub menu first.. See
example below:
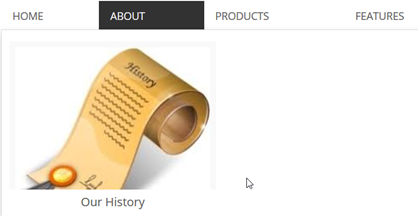
NOTE : This “Image
Grid Display” will not allow for any sub levels below it.
|
|
Only show in this site |
If you are using product matching and want to have a
different menu for each store you have set up, you can enter the keyword
from xproductmatch in the shop$config.asp that you want this
menu item to belong to here.
Note: You must do so in the shop administration
for each different shop you have set up. |


 .
.
 button – you will be asked, “Are you
sure you want to delete this item?” to give you a chance to change your
mind.
button – you will be asked, “Are you
sure you want to delete this item?” to give you a chance to change your
mind. button.