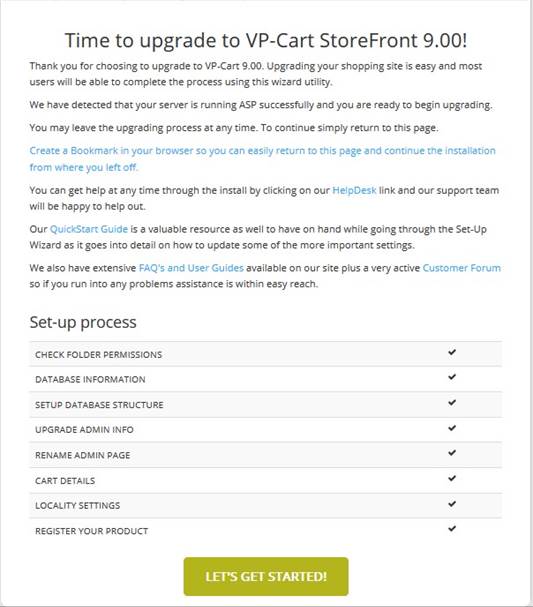
VPCart 9.00 comes with an Upgrade Wizard, which you need to run through your
browser. This Wizard will add new fields and system records
to your database, but will not change any of your existing data.
Please follow
the steps below:
1. Open your browser and enter the URL of your new VPCart folder. For example, http://www.yoursite.com/vpcart/default.htm, where www.yoursite.com is your website address and vpcart is the folder where you installed your new copy of VPCart 9.00.
2. There are two options to choose from: “Install Now” or “Run Upgrade.” Please click the “Run Upgrade” button.
3. You are now ready to upgrade to VPCart 9.00. You will see a Summary Page of the steps you will be going through to upgrade your existing VPCart to the latest release.
Once you have read the page, click
the button at the bottom.
4. The first step is to check your folder permissions and make sure that the required folders have “READ/WRITE” permissions applied.
Click the “Check your folder permissions” button.
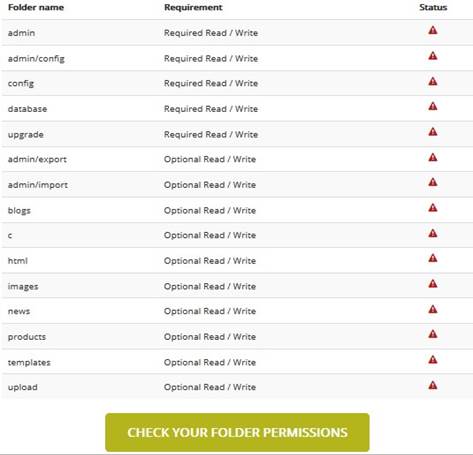
Some of the folders in
VPCart 9.00 need to have read/write
permissions in order to
work properly. This step
will automatically check the required folders to have read/write permission.
Once you are ready, please click the “Check your folder permissions”
button.
Folders that have read/write permission will be displayed with a “Pass” status. Folders that do not have read/write permission will be displayed with a “Fail” status.
If one of your folders appear to
have a “Fail” status, please enable
read/write permission to the folder. You may contact your hosting provider to do this for you if your VPCart files are in a remote server. However, if you are running from a local machine,
you can enable read/write permission to the folder yourself.
To set your folder permissions please
follow the steps in our QuickStart Guide:
http://quickstart.vpcart.com/#folderpermissionlocalpc
Please click the “Check your
folder permissions” button again once you have set the read/write
permission to your folders.
If all required folders have a “Pass” status, then you can click the “Continue” button.
5. The next step is to connect to your
database.
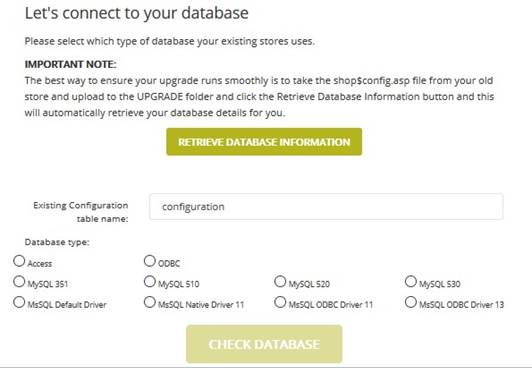
This step will basically retrieve your existing
database for your new VPCart 9.00 site.
You need to ensure that you have placed your original shop$config.asp file from your current site into the Upgrade folder.
Please click “Retrieve Database
Information.”
VPCart will then automatically populate
the database fields with
the connection settings from your existing site.
If you are using Access, Database
name and Folder will automatically be filled in.
If you are using ODBC, the DSN
Name will automatically be filled in.
If you are using SQL SERVER or MySQL, the following db details will automatically be filled in:
Database Name
Database User ID
Database Password
Database Address
Click “Check Database” once you are ready to check if your database is connected or not.
If the db is connected successfully, the “Continue” button will appear and you can click to proceed to the next step.
6. Setup Database Structure.
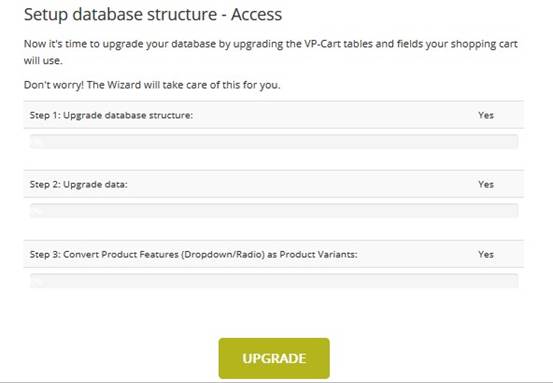
This step will add any new
fields to your existing db to be ready for VPCart 9.00.
Click “Upgrade” to start the process.
Note: Before proceeding, be sure to back up your existing db.
VPCART 9.00 will automatically create new table
called “configuration900_[xshopid]”. The [xshopid] is
retrieving from your shop$config.asp file.
Example, if your xshopid value
have something like this :
const xShopId="furniturestore"
Then the new
table that VPCART will create is e.g. configuration900_furniturestore.
This new configuration table is a copy of your existing configuration table. So after upgrade, your new version will use the configuration900_[xshopid] table.
This upgrade process might take a while, so a processing icon will appear.
Once finished, a summary of the database upgrade will be displayed:
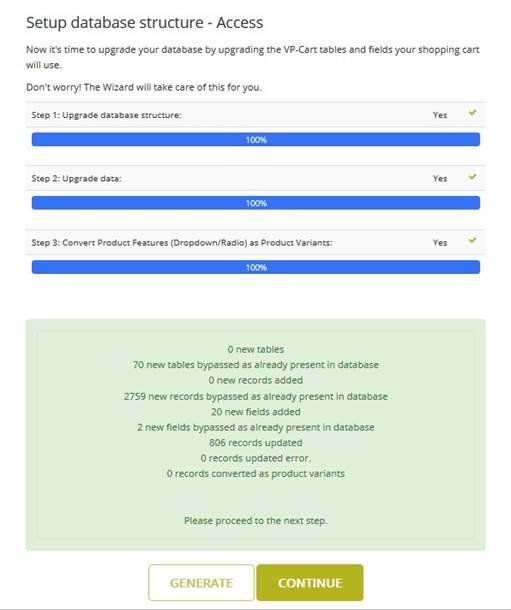
Afterwards, the “Continue” button will appear and you can click it to proceed to the next step.
7. Upgrade Admin Info
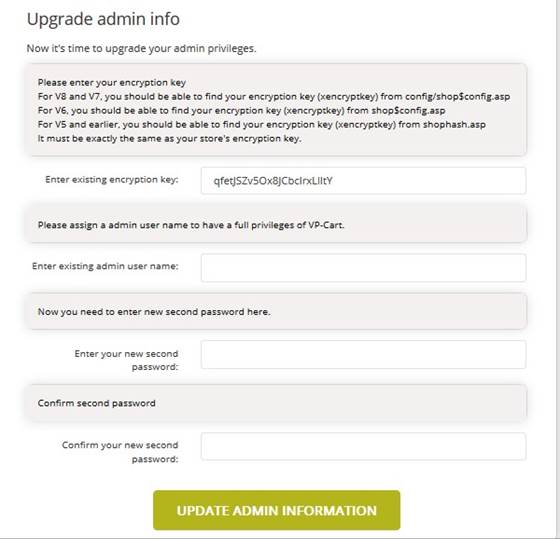
In this step, you need to enter your “existing Admin User Name” and you also need to enter a “New Second Password.” Your existing encryption key will be displayed as well. Encryption key is a unique set of characters used to scramble customer credit card information. You can keep to use the current encryption key or you can enter your own 10+ character encryption key, e.g. jfh73GFKah3o.
VPCart needs to retrieve your existing Admin user
Name to give full privileges to access Administration.
The New Second Password must contain alphanumeric (a-z, A-Z, 0-9) characters. This will ensure the security of your VPCart 9.00 administration.
Please click the “Update Admin Information” button once you have entered the
fields.
If the details you have entered are valid, the “Continue” button will appear. Click the button to proceed to the next step.
8. Rename Admin Page
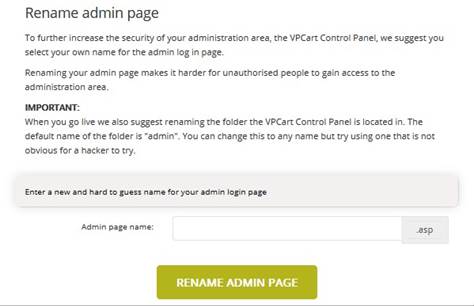
This step will rename your existing Admin Page to the file name you specified.
Please enter a new name for your Admin Page and make sure the page name is not a
common name.
For example, we do not recommend you to create a common name like “admin” or “login.”
You can create the page name with
a combination of alphanumeric
characters (e.g. jacksyte87635).
Click “Rename Admin Page” once you have entered the name.
Click “Continue” to proceed to the next step.
9. Cart Details
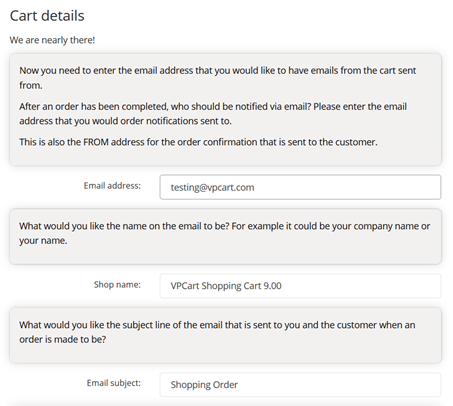
In this step, you need to enter all of the cart details for your VPCart 9.00 site.
Here is the list of fields you need to
provide:
Email address: After an order has been completed, who should be notified? This is the email address of that person. The order confirmation will be sent to the customer’s email address.
Shop Name: The name of your shop. Used on emails to the customer as the name of the sender.
Email Subject: This is simply the subject when the customer gets an email confirmation.
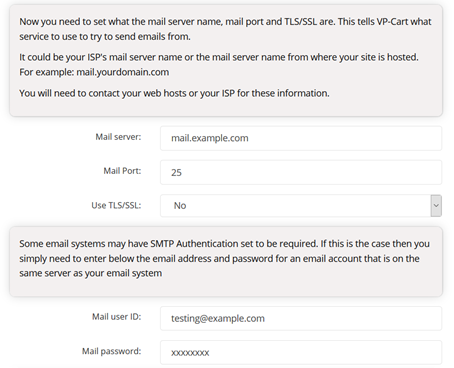
Mail Server: This is the name of the mail service
on your ISP. Your ISP provider should inform you about
this. It will normally
start with
either “mail” or “smtp”. There is no standard name. You must
ask your Windows administrator or Web hosting company. If not set correctly,
emails will not be sent. Please take note that this is
not used with CDONTS or
Unix.
Mail Port: Your mail server port. Usually default
port is 25. Some mail servers may use other port.
Use TLS/SSL:
Is your mail server
requires a secure connection (SSL/TLS) ? Set Yes if needed.
Mail User ID: If your ISP is using a User ID for mail service, you may enter the value here or leave it empty if your ISP is not using any User ID.
Mail Password: If your ISP is using a password for mail service, you may enter the value here or you may leave it empty if your ISP is not using a password.
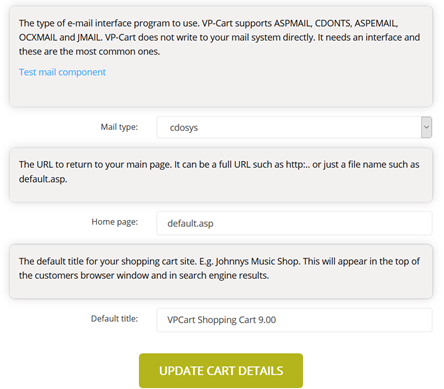
Mail Type: The type of email interface program to use. VPCart supports ASPMAIL, CDONTS, ASPEMAIL, OCXMAIL and JMAIL. VPCart does not write to your mail system directly. It needs an interface and these are the most common ones.
Home Page: The URL to return to your main page. It can be a full URL such as http:.. or just a file name such as default.htm.
Default Title: The default title for your shopping cart site (e.g. Johny Instrumental Shop).
In this step, you can also perfom a test for Mail Component. Click the “Test Mail Component” link to see any available mail components for your hosting. Mail components with an “Available” status can be selected as a value for Mail Type.
Click “Update Cart Details” then click the “Continue” button to proceed to the next step.
10. Locality Settings
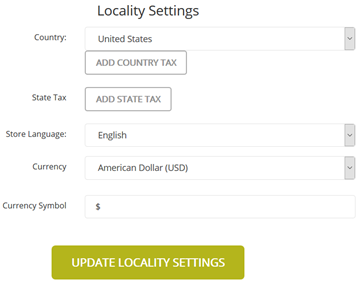
In this step, you can choose
your country, state, language, currency and symbol you want.
You can also add your country tax rate
and state tax rate if needed.
Click “Update Locality Settings”
once done. The button “Continue” will be displayed then and you can
continue to next step.
11. Register Your
Product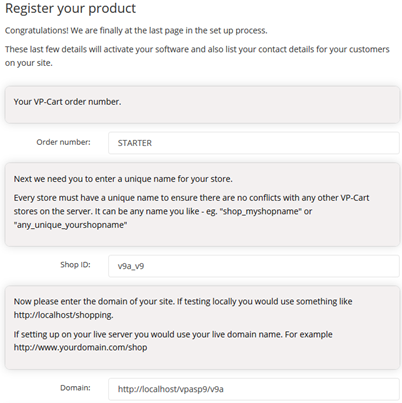
This step will register your purchase of VPCart 9.00 as well as your information details.
Please provide the following details in
the form:
Order Number: Your VPCart Order Number. This should automatically be filled in with your existing order number.
Shop ID: A unique name for your shop (e.g. "shop900_myshopname"). This should automatically be filled in with your existing Shop ID.
Domain: This represents the URL of your site where the shopping cart files are located (e.g. http://www.yourvpaspwebsiteurl.com/vpasp). This should automatically be filled in with your existing domain URL.
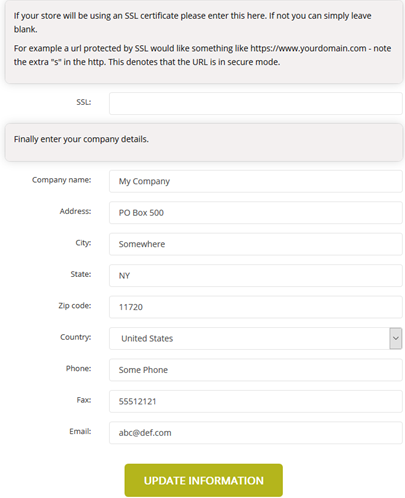
SSL: This is your secure URL to which credit card information is encrypted. This should automatically be filled in with your existing secure URL.
Company Name: Enter your company / shop name
Address: Enter your company / shop address
City: Enter your city
State: Enter your state
ZIP Code: Enter your ZIP code
Country: Enter your country
Phone: Enter your phone number
Fax: Enter your Fax number
Email: Enter your email address
Click “Update Information” after you have entered all the details.
Click “Continue To End” to finish the upgrade process.
Note: After you have run the Wizard, your database will have been updated to the required VPCart 9.00 format.
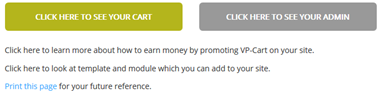
If you want to go to your new VPCart 9.00 Storefront, please go to “Click here to see your cart.”
If you want to go to your new
VPCart 9.00 administration, please go to “Click
here to see your admin.”
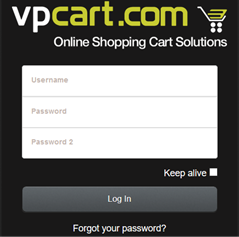
Note:
Username is your existing admin user
ID.
Password is your existing admin password.
Password
2 is your existing
admin password 2. (If you have entered a new second password
2 in the Upgrade Wizard, then please enter your new admin
password 2).
Tick
the “Keep alive” if you want admin session to always alive (without session
timeout).
Once you have completed upgrading your database to VPCart 9.00, you will not be able to use your old admin with a store running 650 or earlier VPCart versions.
So if you have multiple sites running from one database, then you will need to ensure that all sites are managed using a VPCart 9.00 Admin.
We strongly recommend changing the default folder name “admin” to a new unique folder name for security reasons!