** QUICK SETUP GUIDE **
1.0 Introduction
This guide will help you get your copy of VP-ASP shopping cart up and running on either your local server or on your web host. It provides the basics to get you up and running.
2.0 Check Internet Information Services (IIS) is Installed
If you are running your store on a web host then you can skip this section.
System Requirements:
Any of:
• Windows 95/98/NT4/2000/2003/XP-Pro
To check if IIS is running, open a web browser and enter http://localhost
If your IIS is running you will be taken to a page that says your web server is running, if not you will get a “Page Cannot Be Displayed” error.
For more information on installing IIS please visit –
http://www.microsoft.com/resources/documentation/windows/xp/all/proddocs/en-us/iiiisin2.mspx
3.0 Installing VP-ASP – Windows Installation Using Access Database
- You will first need to create a sub-directory on your server to contain your VP-ASP files. This directory should be in the root IIS folder.
a. Name this subdirectory shopping eg: C:/Inetpub/wwwroot/shopping
- Your VP-ASP software should be contained in a zip file. Unzip this file and place the contents into your newly created directory
- Now open the shop$config.asp file in your shopping directory to edit it
Locate approximately line 14 and replace
const xordernumber=""
with
- If using the free version:
const xordernumber="STARTER"
- If using Value, Plus! or Deluxe replcae **** with your order number:
const xordernumber="*****"
- Once this is done type the path to the site into the URL bar of a browser, for example
http://localhost/shopping
You should now see the VP-ASP welcome screen, and if you press the link “Enter your VP-ASP Shopping Cart”, you will see the home page of your store.
- Now if you delete both index.htm and default.htm, the first page you will see each time you enter your stores URL in a browser will be the stores home page.
3.1 Setting Database Permissions
If your site is uploaded to your web host you can skip this section, but you will need to ask your host to enable read and right permissions on the database folder in your shopping sub-directory
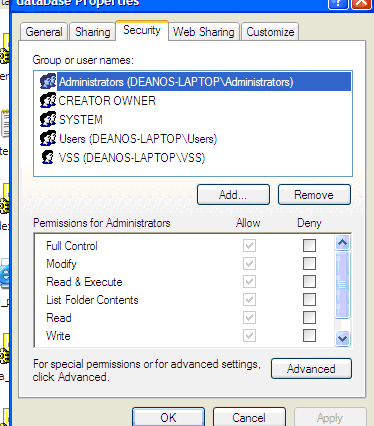
- Right click on the directory containing the database
- Click on 'Properties'
- Choose the 'Security' tab form the dialog box window
- Uncheck 'Allow inheritable permissions from parent to propagate to this object', from the bottom of the dialog box
- Next, click on the 'Add' button at the top left of the window

- Next the 'Select Users or Groups' dialog box will open, highlight 'IUSR_MyComputer' account from the list by clicking on it. Where 'MyComputer' is this will be the name of your computer. 'IUSER' is the Internet Guest Account setup by default when IIS is installed on the system.
- Next click on the 'Add' button in the middle left of the dialog box. You should then see 'MyComputer\IUSER_MyComputer' appear in the box in the bottom half of the dialog box. Again where 'MyComputer' is will be the name of your computer
- Now click on the 'OK' button at the bottom right of the 'Select Users or Groups' dialog box.
- 9. You should now be back at the 'Security Properties' dialog box where the top box should now contain the 'Internet Guest Account (MyComputer\IUSER_MyComputer)'
- Highlight the 'Internet Guest Account (MyComputer\IUSER_MyComputer)' by clicking on it in the top box
- Select 'Read' and 'Write' permissions for this account by checking the boxes at the bottom of the window (If you are not to worried about security you could check all the boxes to make sure that you have no problems with permissions).
- Next repeat all the steps above on the database itself, to make sure the database also has the correct permissions
3.1.2 Test Permissions
Now you will have to test to ensure all the permissions are set correctly.
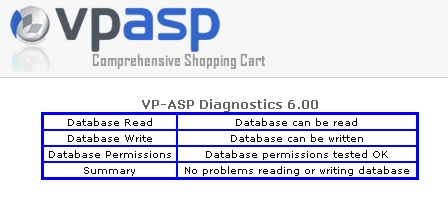
- In your browser run the diag_dbtest.asp script that is located in your shopping directory
For example: http://localhost/shopping/diag_dbtest.asp
- Now click Test Database
You should receive the following screen

If you don’t get the screen above, go back to 3.1 and go through the steps again to ensure that you didn’t miss anything.
4.0 VP-ASP – Windows Installation Using SQL Server Database
- You will first need to create a sub-directory on your server to contain your VP-ASP files. This directory should be in the root IIS folder.
a. Name this subdirectory shopping eg: C:/Inetpub/wwwroot/shopping
- Your VP-ASP software should be contained in a zip file. Unzip this file and place the contents into your newly created directory
- Now open the shop$config.asp file in your shopping directory to edit it
Locate approximately line 14 and replace
const xordernumber=""
with
- If using the free version:
const xordernumber="STARTER"
- If using Value, Plus! or Deluxe replcae **** with your order number:
const xordernumber="*****"
- Once this is done type the path to the site into the URL bar of a browser, for example
http://localhost/shopping
You should now see the VP-ASP welcome screen, and if you press the link “Enter your VP-ASP Shopping Cart”, you will see the home page of your store.
- Now if you delete both index.htm and default.htm, the first page you will see each time you enter your stores URL in a browser will be the stores home page.
4.1 Setting up the SQL Server Database
- Ask your web host to create a database for you and provide you with the server address of the database.
- You now how to tell VP-ASP where the empty database is located
a. Open your shop$config.asp file and change the following
xdatabase = “yourDatabaseName”
xdatabaseType = “SQLSERVER”
xsqluser = “userid”
xsqlpassword = “password”
xsqlserver = “address of the database”(this could be in the form of a URL
or a IP address)
- Now run the script diag_dbtest.asp in your browser to check if the permissions are correct.
For Example: www.yourstore.com/shopping/diag_dbtest.asp
On this page now press “Test Database”
You should receive an error page displaying either tblusers could not be found or table configuration could not be found. If you receive either of theese errors it means your site can see the database and you can now create the tables using the convertsql.asp utility.
If you do not see this screen, please check that you have set up the settings in your shop$config.asp file correctly as outlined above, if they are setup correctly and you still don’t see this screen, please contact your web host and ask them to make sure you have read and write permissions set on the database.
- Now you are ready to create the table (VP-ASP offers a tool called convertsql.asp which can be used to create the tables)
- Run convertsql.asp in your browser
For Example: www.yourstore.com/shopping/convertsql.asp
- In the filename field type create600sqlserver.txt
While running this script you will have messages being displayed on the screen, informing you of which tables are being created.
If you get an error that the database cannot be read or written, please check the shop$config.asp file and make sure it has been set up as the instruction say above. If this is correct and you still get the error, please ask your host to make sure that the database has read and write permissions.
- You will now have to load the default configuration options.
a. Run script convertsql.asp in your browser again
b. In the filename field now type create600admin.txt
As above you will see messages being displayed letting you know what is being written.
- Now to load the demo shop, demo products etc. (this step is optional)
a. Run script convertsql.asp in your browser again
b. In the filename field now type create600demo.txt
5.0 VP-ASP – Unix Installation Using MySQL Database
Verify that your host is running Chillisoft (Sun ASP). If not, you will not be able to run VP-ASP on your host.
- You will first need to create a sub-directory in the root directory on your server.
The root directory will usually be wwwroot.
a. Name this subdirectory shopping eg: wwwroot/shopping
- Now unzip the VP-ASP files into this directory
5.1 Setting up the MySQL Database
- Ask your web host to create a database for you and provide you with the server address of the database.
- You now how to tell VP-ASP where the empty database is located
a. Open your shop$config.asp file and change the following
xdatabase = “yourDatabaseName”
xdatabaseType = “MYSQL”
xsqluser = “userid”
xsqlpassword = “password”
xsqlserver = “address of the database”(this could be in the form of a URL
or a IP address)
- Now run the script diag_mysqldbtest.asp in your browser to check if the permissions are correct.
For Example: www.yourstore.com/shopping/diag_mysqldbtest.asp
On this page now press “Test Database”
You should get the following screen

If you do not see this screen, please check that you have set up the settings in your shop$config.asp file correctly as outlined above, if they are setup correctly and you still don’t see this screen, please contact your web host and ask them to make sure you have read and write permissions set on the database.
- Now you are ready to create the table (VP-ASP offers a tool called mysqlcreate.asp which can be used to create the tables)
- Run mysqlcreate.asp in your browser
For Example: www.yourstore.com/shopping/mysqlcreate.asp
- In the filename field type create600mysql.txt
While running this script you will have messages being displayed on the screen, informing you of which tables are being created.
If you get an error that the database cannot be read or written, please check the shop$config.asp file and make sure it has been set up as the instruction say above. If this is correct and you still get the error, please ask your host to make sure that the database has read and write permissions.
- You will now have to load the default configuration options.
a. Run script mysqlcreate.asp in your browser again
b. In the filename field now type create600admin.txt
As above you will see messages being displayed letting you know what is being written.
- Now to load the demo shop, demo products etc. (this step is optional)
a. Run script mysqlcreate.asp in your browser again
b. In the filename field now type create600demo.txt
6.0 Final Notes
VP-ASP is now installed, and your store should now be up and running.
Please be sure to also read through the Developers Guide, for more handy tips and setup guides for different functionalities of the shopping cart.
Help Guides can be viewed at http://www.vpasp.com/helpnotes
Times Viewed:
7658
Added By:
Steve Baldwin
Date Created:
12/9/2005
Last Updated:
3/6/2006


