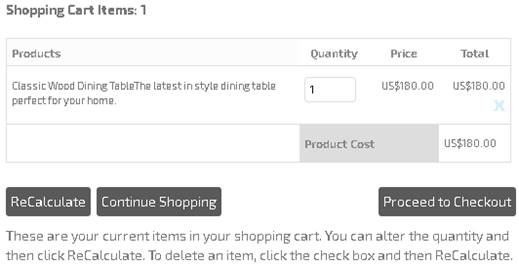
This section will explain how to change the look/design of the following sections:
- Shopping Cart Items title
- Cart table
- Continue / Recalculate / Checkout button
- Bottom text (e.g. These are your current items in your shopping cart...)
To change the look/design of the “Shopping Cart Items: 1” title, please follow the steps below:
1. Open the “shopaddtocartdesign.asp” file using Notepad.
2. Locate the code below:
<%="<span class='fontbold carttittle'>"%><%=GetLang("langCart01")%> <%=totalcartquantity%><%="</span>"%>
Note: The code above is used to print out the “Shopping Cart Items: 1” information.
You can update the code above to your own HTML or CSS style.
For example, if you wish to display the text using an Arial font with a size of 20px, then please change the code above to:
<%="<span style='font-family:arial;font-size:20px;'>"%><%=GetLang("langCart01")%> <%=totalcartquantity%><%="</span>"%>
Next, GetLang("langCart01") is used to display the text: “Shopping Cart Items:”
The caption is stored in the languages table. If you wish to change the text, then simply refer to VPCart 8.00 User Manual, Chapter 12.1.3. Changing Language Values.
Totalcartquantity is used to display the total number of cart items.
If you wish to modify the style of totalcartquantity, for example, you want to display the text in bold, then your code should be similar to the one below:
<%="<span style='font-family:arial;font-size:20px;'>"%><%=GetLang("langCart01")%> <b><%=totalcartquantity%></b><%="</span>"%>
3. After you have modified the changes shown above, save the file and upload to your site.
Below is a preview of the example:

To change the look/design of the cart table, please follow the steps below:
1. Open the “shopcartformatdesign.asp” file using Notepad.
2. The code explained below is used to format the following:
To format the titles in the table, please locate the codes below:
sub DisplayTitle (percent, titlename)
if titlename = getlang("langproduct01") then
HtmlWrite "<th class=""menuhdr"">" & TitleName & "</th>"
else
HtmlWrite "<th style=""text-align: center"">" & TitleName & "</th>"
end if
end sub
Note: CSS “menuhdr” is stored in the “main-responsive.css” file, which is located in the “templates/default” folder:
table.view_cart tr:first-child
th.menuhdr {
background: none;
}
You can update the CSS code above to
suit your own style or
preference.
For example, if you wish to change the background color of the table title to black, then please update the CSS to:
table.view_cart tr:first-child th.menuhdr {
background-color:#000000;
}
Preview of the example above:
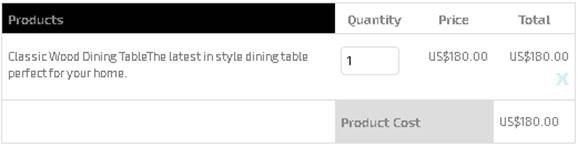
To format the records below the titles in the table, please locate the subroutines below the “shopcartformatdesign.asp” file:
sub AddField
sub AddQuantity
sub AddRemoveBox
You can edit any HTML code inside the subroutines mentioned above.
Now, we will try to change the look or design of the buttons in shopaddtocart.asp. By default, the three buttons in the page can be set up from the Aministration.

You can upload your own image to replace these.
To update your own image button to replace the Continue button, please follow the steps below:
1. Upload your own created button image to the “ templates/default/images” folder.
2. Log in to your VPCart Control Panel.
3. Go to Advanced Settings > Software Configurations.
4. Search for “xbuttoncontinueshopping.”
5. Enter value. For example, “templates/default/images/yourownimage1.gif.”
6. Click “Continue.”
To update your image button to replace the Recalculate button, please follow the steps below:
1. Upload your own created button image to the “templates/default/images” folder.
2. Log in to your VPCart Control Panel.
3. Go to Advanced Settings > Software Configurations.
4. Search for “xbuttonrecalculate.”
5. Enter value. For example, “templates/default/images/yourownimage2.gif.”
6. Click “Continue.”
To update your own image button to replace the Checkout button, please follow the steps below:
1. Upload your own created button image to the “templates/default/images” folder.
2. Log in to your VPCart Control Panel.
3. Go to Advanced Settings > Software Configurations.
4. Search for “xbuttoncheckout.”
5. Enter value. For example, “templates/default/images/yourownimage3.gif.”
7. Click “Continue.”
We will now change the text at the bottom, which is displayed as:

To change the bottom text in “shopaddtocart.asp,” please follow the steps below:
1. Open the “Shopaddtocartdesign.asp” file using Notepad.
2. Locate the code below:
<p><%=GetLang("langCart02")%></p>
3. Simply change the code above to suit you own style or preference.
For example, if you wish to change the font color to green and
set the text to
bold, then please update
the code above to:
<p style='color:#009900;'><b><%=GetLang("langCart02")%></b></p>
Preview of the example above:
