
To insert
Twittercontainer
in the left bar of your
site, please follow the steps below:
1. In the top menu, select “Website” then “Layout Manager” from the dropdown menu.
2. On the Layout Manager
Page in the left
bar, click the  button.
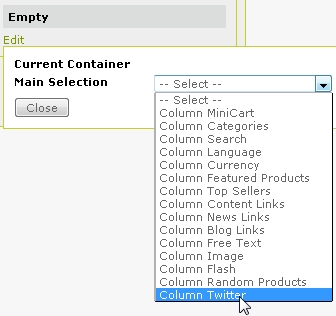
3. Click the “Edit” link in the Empty box.

4. Select Column
Twitter from the dropdown menu.
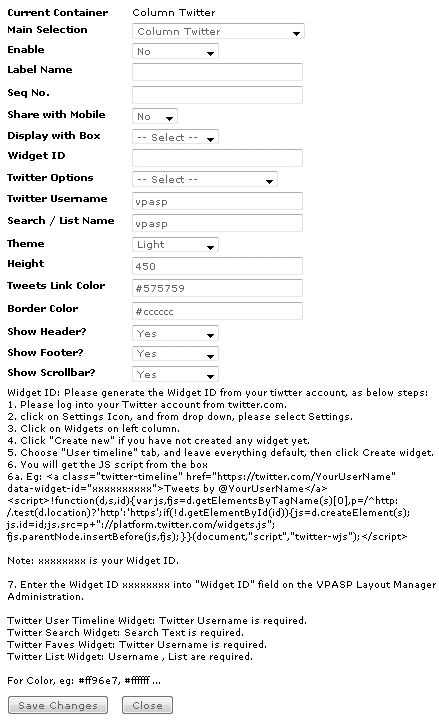
5. To set up Twitter, please use the form as shown below:

Main Selection: This is the dropdown menu that provides
a list of containers you can choose.
Enable: Set this to “Yes’ to display Twitter.
Label Name: Enter a title. You can use language keyword for this
or directly enter your text.
Seq No.: This is the vertical sequence number. Please enter values with a 2-digit format. For example, a 01 value means the Language Section will be displayed first in the sequence. You cannot enter a value with a single digit (e.g. 1). If you want to display the Language Section last in the sequence, please enter a bigger number (e.g. 14).
Share with Mobile: Set to “Yes” to display for mobile site too. Set to “No” to display for desktop layout site only.
Display with Box: Set this to “Yes” will display
Twitter in a box.
Widget ID: Enter your Twitter Widget ID.
Below are the
steps to get the Widget ID:
1. Please log into your Twitter account
from twitter.com.
2. Click on your profile picture at the top right. From the dropdown menu, please select
“Settings.”
3. Click “Widgets” on the left column.
4. Click
"Create new" if you have not created any widget yet.
5. Choose the
"User timeline" tab and leave default settings as is, then click
“Create widget.”
6. You will get the JS script from the box.
Eg:
<a class="twitter-timeline"
href="https://twitter.com/YourUserName"
data-widget-id="xxxxxxxx">Tweets by @YourUserName</a>
<script>!function(d,s,id){var
js,fjs=d.getElementsByTagName(s)[0],p=/^http:/.test(d.location)?'http':'https';if(!d.getElementById(id)){js=d.createElement(s);js.id=id;js.src=p+"://platform.twitter.com/widgets.js";fjs.parentNode.insertBefore(js,fjs);}}(document,"script","twitter-wjs");</script>
Note: xxxxxxxx is your Widget
ID.
Twitter Options: Choose your widget.
Twitter Username: Enter your Twitter username. Required for Profile and Faves widget.
Search / List Name: Enter the search text. Required for Search widget.
Theme: Select your preferred theme: Light or
Dark.
Height: Enter widget height in pixels (e.g. 300). Leave empty if you will not set this field.
Tweets Link Color: Enter the tweets link color (e.g. #b740c2).
Border Color: Enter the border color (e.g. #000000).
Show Header?: Select “Yes” to show the Twitter header.
|
|
In the screenshot, the Twitter header is the area marked red for illustration purposes. This is after you set the Show Header to “Yes.” |
Show Footer?: Select “Yes” to show the Twitter footer.
|
|
In the screenshot, the Twitter footer is the area marked red for illustration purposes. This is after you set Show Footer to “Yes.” |
Show
Scrollbar?: Select
“Yes” to show the scrollbar.
Once all your fields
have been entered, please always click
the “Save Changes’ button.