To insert an
image in the left bar of your site, please follow the steps below:
1. In the top menu, select “Website” then “Layout Manager” from the dropdown menu.
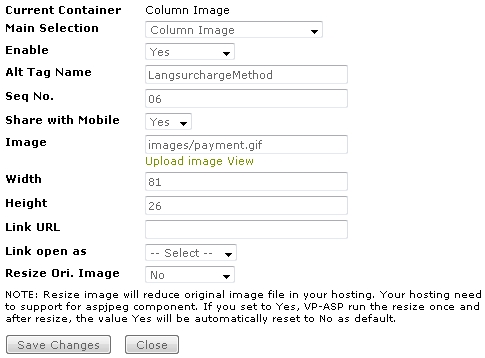
2. On the Layout Manager Page, go to “Column Image” and click “Edit.”

3. To set up your image, use the form as shown below:

Main Selection: This is the dropdown menu that provides
a list of containers you can choose.
Enable: Set this to “Yes” to display the image.
Alt Tag Name: Enter Alt tag for the image. You can use language keyword for this or directly enter your text.
Seq No.: This is the vertical sequence number. Please enter values with a 2-digit format. For example, a 01 value means the image will be displayed first in the sequence. You cannot enter a value with a single digit (e.g. 1). If you want to display the image last in the sequence, please enter a bigger number (e.g. 12).
Share with Mobile: Set to “Yes” to display for mobile site too. Set to “No” to display for desktop layout site only.
Image: Click “Upload image” to upload a
file with your logo. Click “View” to preview your current
logo.
Width: Enter image width.
Height: Enter image height.
Link Url: Enter a site URL for the image link
(e.g. http://www.othersite.com)
Link open as: Choose to open in the same page or in a new page.
Resize Ori. Image: Set this to “Yes” to resize your original image and reduce the size of the file based on the width and height specified. Your hosting needs to enable the Aspjpeg component in order for this feature to work. If set to “Yes,” VPCart will resize the image once. After resizing, the “Yes” value will automatically be reset to “No” as default.